Getting started
System requirements
A standard Python installation is required, as well as any additional Python modules that are listed in the README file under the “Dependencies” section. PyRDM is designed to run on the Linux operating system.
It is recommended that users use the terminal to install and run PyRDM.
Downloading and installing
PyRDM’s source code is hosted on GitHub and can be found here: https://github.com/pyrdm/pyrdm. The first step is to download the source code using:
git clone https://github.com/pyrdm/pyrdm.git pyrdm
The core dependencies that PyRDM needs to function can then be installed by navigating to the base directory of PyRDM (i.e. the directory that the Makefile is in) using
cd pyrdm
and executing
sudo pip install -r requirements.txt
Use the following command to install the PyRDM library:
sudo make install
Note 1: sudo is likely to be necessary here if the default install
directory is located outside of /home. This will yield a system-wide
install of PyRDM, which is recommended.
Note 2: In order for Python to find the PyRDM module, you will need
to add the PyRDM base directory to your PYTHONPATH environment
variable, unless you have used sudo as mentioned in Note 1 above.
This can be achieved using:
export PYTHONPATH=$PYTHONPATH:/path/to/pyrdm
You may wish to add this statement to your
/home/your_username/.bashrc or /etc/bash.bashrc files so the
PYTHONPATH is set correctly each time you log in.
Configuring
You should copy the contents of the file pyrdm.ini.example to a new
file called pyrdm.ini and save it in the
/home/your_username/.config directory. If this directory does not
exist, please create it first using
mkdir /home/your_username/.config
The contents of the new file pyrdm.ini should then be modified as
per the guidance in the following subsections.
Figshare authentication
PyRDM requires a personal authentication token in order to publish and
modify files using your Figshare account. You will need to login and use
the Figshare web interface to generate this authentication token,
after which you should paste it into the figshare section of the
configuration file.
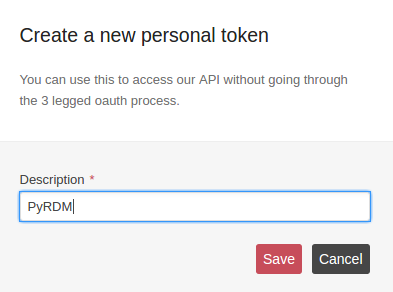
Click
Create Personal TokenIn the description box, type “PyRDM” as per figure:create_token.
The details for the new personal access token.
Click
Save. The token will appear and should be pasted into thepyrdm.iniconfiguration file.Click
Doneand the new token should appear in the list, as per figure:token_list.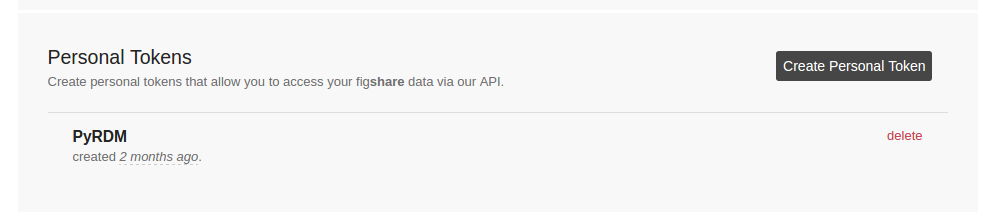
The new personal access token.
Note: If you are publishing through a group account, you will need to ask the account’s administrator for the authentication details.
Zenodo authentication
Zenodo uses a personal access token to handle authentication.
Go to http://zenodo.org/account/settings/applications/tokens/new/
Enter
PyRDMas the name of the token. Ensure thatdeposit:actionsanddeposit:writeare selected, as per figure:zenodo_token.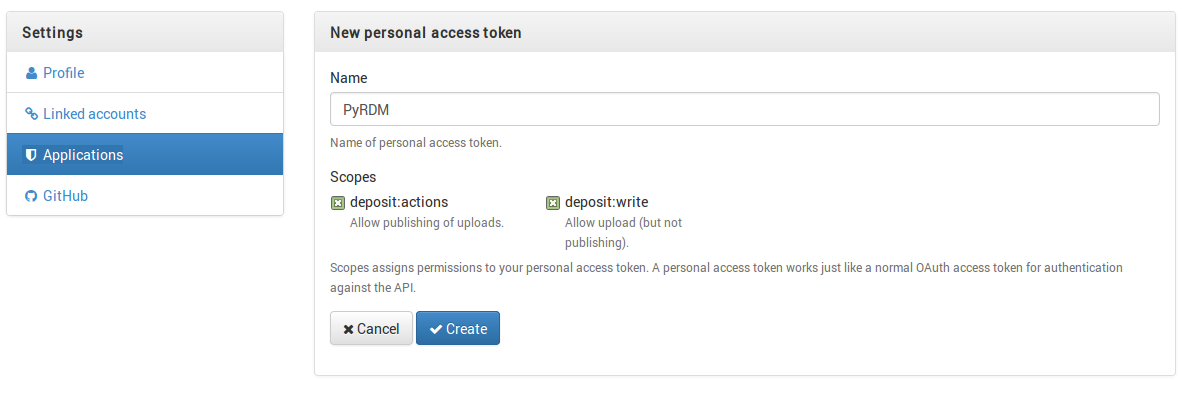
Setting up a new personal access token for PyRDM.
Click
Create. The access token should be pasted into the[zenodo]section of thepyrdm.iniconfiguration file.Zenodo requires at least one author’s name and affiliation to be present when creating a deposition. For a software deposition, PyRDM will try to obtain this information from the
AUTHORSfile. However, for a dataset deposition, this information needs to be provided under the[general]section of thepyrdm.iniconfiguration file.
DSpace authentication
PyRDM provides limited support for publishing with DSpace-based services which use the SWORD protocol (version 2).
- Locate the URL of the SWORD Service Document, and add it under the
[dspace]section of thepyrdm.iniconfiguration file. Note: this URL may need to be obtained from the system administrator. - Add the title of the DSpace Collection that you want to publish in. Note: the publication’s privacy settings are determined by the DSpace Collection, not by the
privateparameter in PyRDM. - Add your user name and password used to access the DSpace server. Note: this is currently stored in plain text, so make sure that the PyRDM configuration file is not readable by other users.
Testing
PyRDM comes with a suite of unit tests which verify the correctness of its functionality. It is recommended that you run these unit tests before using PyRDM by executing:
make test
on the command line. Many of these tests require access to a Figshare and a Zenodo
account, so please ensure that the pyrdm.ini setup file contains
valid authentication tokens.